Provision a Network Load Balancer on Kubernetes with MetalLB
Set up a MetalLB Load Balancer on a on-premises Kubernetes Cluster


MetalLB is a load-balancer for bare-metal Kubernetes clusters, using standard routing protocols.
Introduction
❗️ Updated for MetalLB v0.13.7 💥
Kubernetes offers the following service types:
ClusterIP: provides a load-balanced IP address for one or more pods that match a label selector and forwards requests to this IP address. Consequently, that is a service that is accessible only within your cluster. No external client or application can reach the exposed endpoints. The only exception is via Kubernetes proxy but this is neither a permanent nor a rigid solution that should be used beyond development purposes (that’s a non-option even for dev environments if you ask my personal opinion)
NodePort: this one exposes a static or dynamic port, depending on the configuration, in the range of high ports 30000–32767, on every node. It is built on top of a ClusterIP type service by exposing the ClusterIP service outside of the cluster by forwarding client traffic, via kube-proxy, to the exposed node ports.
LoadBalancer: this service type is built on top of a NodePort service type by provisioning and configuring external load balancers and exposing one or more pods that match a label selector and forwards layer 4 traffic to the underlying worker nodes that host and expose those pods. When you create a LoadBalancer service in a Public Cloud (e.g AWS, Azure, GCP, Open Telekom Cloud etc) there is the required glue in place to spin a new Network Load Balancer and assign its IP address as the external IP of the LoadBalancer service. In a private cloud or on-premises however, the implementations of network load balancers are missing and this is the void that MetalLB comes to fill in.
ExternalName: This service type returns and is been accessed by a CNAME record instead of a ClusterIP address. We will dissect this service in another article as it a quite interesting option that deserves a space of its own.
I am not going to refer to Ingresses at all in this article, as they are a different sort of resource and do not technically belong to this
kindalthough they facilitate similar functionality, but in another OSI layer.
Without MetalLB or any similar software solution — we are talking only software solutions here — the External IP of any newly created service in Kubernetes will stay indefinitely pending. MetalLB’s purpose is to cover this deficit by offering a network load balancer implementation that integrates with standard network equipment so that external services on bare-metal clusters work in a similar way as their equivalents in IaaS platform providers.
Let’s try it ourselves for a moment. We are going to use a sample image from Google, grc.io/google-samples/hello-app:1.0, that spins a lightweight web server that comes very handy for this demo as it shows in the landing page the name of the pod.

This is what we expect to see when we open our app in a browser
kubectl create deployment hello-server --image=gcr.io/google-samples/hello-app:1.0
and next, we want to expose the service:
kubectl expose deployment hello-server --type LoadBalancer --port 80 --target-port 8080
let’s see now what effect those two commands had:
kubectl get all
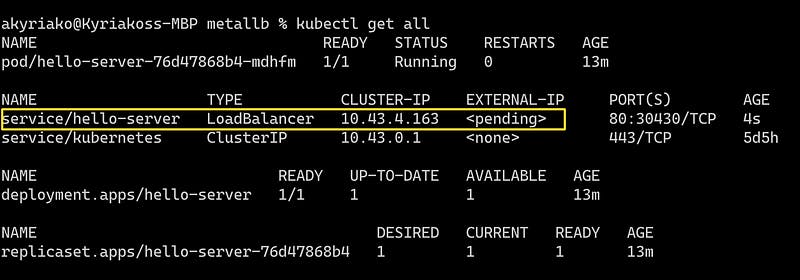
As you can notice the External IP for our hello-server service is pending, and this is not going to change. Remove the deployment and let’s try to solve this little inconvenience.
Installation
I have an on-prems 3-nodes RKE Cluster already provisioned, let’s have a quick look at it:
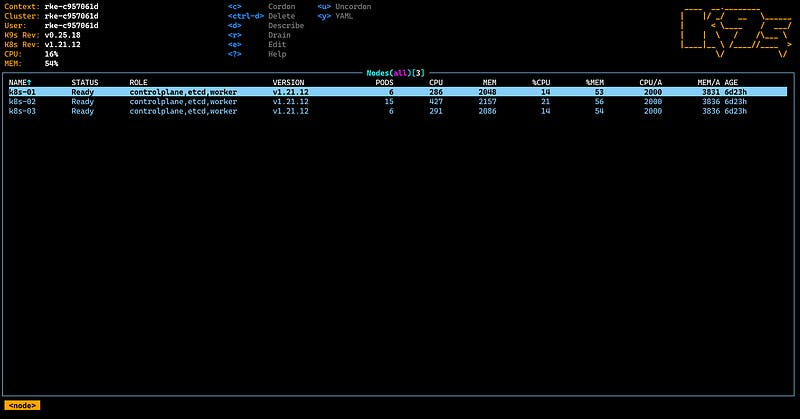
alternatively from the terminal via kubectl:
kubectl get nodes -o wide

The installation of MetalLB is easy as a breeze, and we are going to perform it by applying the necessary manifests (everything will be provisioned in a new namespace named metallb-system):
kubectl apply -f https://raw.githubusercontent.com/metallb/metallb/v0.13.7/config/manifests/metallb-native.yaml
and then we need to provide the components required by MetalLB. The next manifest will deploy MetalLB to the cluster, in metallb-system namespace we just created. The components are:
the
metallb-system/controllerdeployment. A cluster-wide controller that handles IP assignments.the
metallb-system/speakerwhich is a daemonset. That is the component to make the services reachable.and the service accounts for the controller and speaker, along with the RBAC permissions that the components required.
Let’s see what is provisioned so far:
kubectl get all --namespace metallb-system
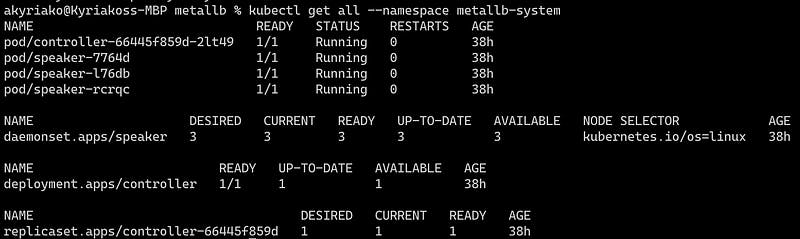
The installation manifest does not include a configuration file. MetalLB’s components although will start, they will remain idle until we provide the required configuration as an IpAddressPool, a new Kind introduced in this version and replaced the old way of provisioning address pool configuration with ConfigMap.
Let’s name it ipaddresspool.yaml:
apiVersion: metallb.io/v1beta1
kind: IPAddressPool
metadata:
name: default-pool
namespace: metallb-system
spec:
addresses:
- 192.168.1.240-192.168.1.250
We are going to use the Layer 2 configuration. Layer 2 mode is the simplest to configure and we are going to need only a range of IP addresses. As explained in the official documentation:
In this example I am going to bind MetalLB with the addresses from192.168.1.240 to 192.168.1.250of my home network.
IMPORTANT: Make sure you exclude this slice from the address pool of your DHCP server, otherwise you will run into troubles.
For this, we need to create an additional manifest and provision an object of the type L2Advertisement (that’s a newly introduced kind as well).
Let’s name it l2advertisement.yaml:
apiVersion: metallb.io/v1beta1
kind: L2Advertisement
metadata:
name: default
namespace: metallb-system
spec:
ipAddressPools:
    - default-pool
When MetalLB sets the external IP address of an ingress LoadBalancer service, the corresponding entries are created in the iptables NAT table and the node with the selected IP address starts responding to HTTP requests on the ports configured in the LoadBalancer Service.
Now let’s deploy these manifests:
kubectl apply -f ipaddresspool.yaml
kubectl apply -f l2advertisement.yaml
Now we are ready to test a workload once again!
Take it for a test drive
Let’s try once again to deploy the workload that we failed to properly expose before having MetalLB in place:
kubectl create deployment hello-server --image=gcr.io/google-samples/hello-app:1.0
then, expose the service
kubectl expose deployment hello-server --type LoadBalancer --port 80 --target-port 8080
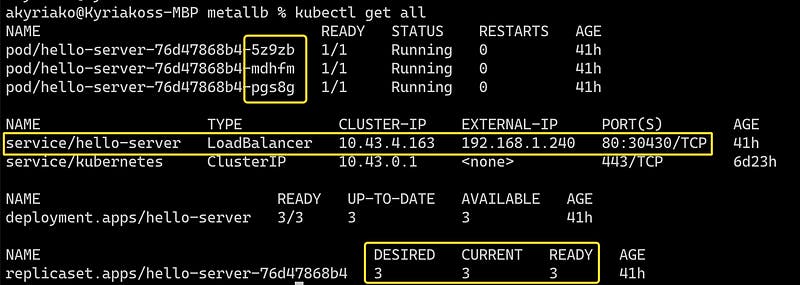
and let’s see what happened this time: Deployments, Pods, ReplicaSets are identical but the Service itself has a pleasant surprise for us: The first IP from our pool has been assigned as the External-IP of the service!

If you are wondering which terminal-based tool I use, this is K9s and I would recommend it because it is just brilliant: Kubernetes CLI To Manage Your Clusters In Style!
Back to our test:
First, let’s scale our deployment to see the load-balancing effect clearer
kubectl scale --replicas=3 deployment hello-server
Let’s try to call the load-balanced endpoint now:
for i in {1..5}; do curl http://192.168.1.240; done
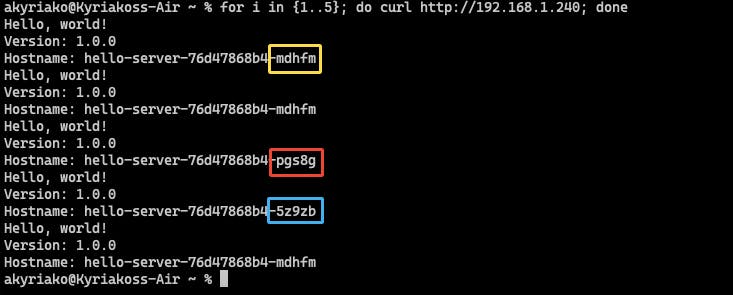
That was pretty neat, right? Check out how the requests are load-balanced among our 3 pods!
Summary
The whole installation lasts no longer than 5 minutes and solves once and for all an issue that at first sight is rather obscure and complicated for beginners in Kubernetes. In a soon-to-come article, we will see how we can expose our services out of the boundaries of Kubernetes even more efficiently by using an Nginx Controller Ingress. Stay tuned!