Install Kubernetes 1.27 with Cilium on Ubuntu
Step by step installation of a Kubernetes 1.27 Cluster, with 3 workers and 1 master nodes, on Ubuntu with Kubeadm and Cilium as CNI


What is the goal?
After completing all the steps below, you will have a Kubernetes 1.27 Cluster running on Ubuntu supported by Cilium as CNI.
What do we need?
4 virtual machines on the virtualization software of your preference. 3 virtual machines as workers and 1 as master. Recommended hardware specs: 3072 MB RAM, 1 vCPU.
Add a Bridge Network interface on every virtual machine that would make it reachable from your host machine (I am going to use VirtualBox and Vagrant for this piece; Vagrant will add a NAT interface for its purposes — if you don’t want to follow that path and stick to plain VirtualBox you can use as well a NAT Network or a Host-Only Network interface instead of Bridge)
Don’t rush into creating virtual machines in VirtualBox, I will provide a vagrant script that wraps up all the steps needed in a link at the end of this article.
What is Cilium?
Cilium is an open-source networking and security project that provides high-performance networking and load balancing for applications running in containerized environments like Kubernetes. It aims to enhance the capabilities of container orchestration platforms and enable secure, scalable, and efficient communication between application services.
Key features and functionalities of Cilium include:
API-Aware Network Security: Cilium is capable of understanding the application-layer protocols and enforcing security policies at the API level. This allows for more fine-grained security controls, such as HTTP-aware filtering and enforcing security based on API endpoints.
Transparent Encryption and Identity-Aware Security: Cilium supports transparent encryption of inter-service communication, ensuring that data exchanged between services remains encrypted and secure. It can also leverage identity-aware security, where access to services is granted based on identity and not just IP addresses.
Load Balancing: Cilium can perform layer 4 (transport layer) and layer 7 (application layer) load balancing for service traffic, helping to distribute requests evenly across the application instances and ensuring high availability.
BPF-Based Data Path: Cilium leverages BPF (Berkeley Packet Filter), a powerful in-kernel technology, to implement its data path. BPF provides efficient packet processing capabilities, enabling Cilium to handle networking tasks with minimal overhead and latency.
Service Mesh Integration: Cilium can integrate with service mesh solutions like Envoy to provide advanced networking and security features in the context of a service mesh architecture.
Deep Visibility and Monitoring: Cilium offers observability features, providing insights into network communication between services, network policies, and traffic metrics, which can be invaluable for troubleshooting and monitoring.
Preparation
You have to perform these steps on every virtual machine. The first thing we have to do is to install a container runtime on every host, and in this article, we are going to go with containerd.
remove all — if any — conflicting or outdated packages:
for pkg in docker.io docker-doc docker-compose podman-docker containerd runc; do sudo apt-get remove $pkg; done
update the apt package index and install the following packages to allow apt to use a repository over HTTPS:
sudo apt-get update
sudo apt-get install ca-certificates curl gnupg -y
add docker’s official GPG Key:
sudo install -m 0755 -d /etc/apt/keyrings
curl -fsSL https://download.docker.com/linux/ubuntu/gpg | sudo gpg --dearmor -o /etc/apt/keyrings/docker.gpg
sudo chmod a+r /etc/apt/keyrings/docker.gpg
setup the repository:
echo \
"deb [arch="$(dpkg --print-architecture)" signed-by=/etc/apt/keyrings/docker.gpg] https://download.docker.com/linux/ubuntu \
"$(. /etc/os-release && echo "$VERSION_CODENAME")" stable" | \
sudo tee /etc/apt/sources.list.d/docker.list > /dev/null
update the package index and install the latest versions of the following packages:
sudo apt-get update
sudo apt-get install docker-ce docker-ce-cli containerd.io docker-buildx-plugin docker-compose-plugin -y
if you configure systemd as the cgroup driver for the kubelet, you must also configure systemd as the cgroup driver for the container runtime. containerd is using /etc/containerd/config.toml to configure its daemon. In that case you need to configure additionally in that file the systemd group driver for runC (dependency of containerd).
cat <<EOF | sudo tee -a /etc/containerd/config.toml
[plugins."io.containerd.grpc.v1.cri".containerd.runtimes.runc]
[plugins."io.containerd.grpc.v1.cri".containerd.runtimes.runc.options]
SystemdCgroup = true
EOF
enable CRI plugins:
sudo sed -i 's/^disabled_plugins \=/\#disabled_plugins \=/g' /etc/containerd/config.toml
and install the CNI plugins:
sudo mkdir -p /opt/cni/bin/
sudo wget https://github.com/containernetworking/plugins/releases/download/v1.3.0/cni-plugins-linux-amd64-v1.3.0.tgz
sudo tar Cxzvf /opt/cni/bin cni-plugins-linux-amd64-v1.3.0.tgz
enable and restart the containerd service:
systemctl enable containerd
systemctl restart containerd
As a second step we need to configure our Linux boxes to forward IPv4 and instruct iptables to see bridged traffic:
cat <<EOF | sudo tee /etc/modules-load.d/k8s.conf
overlay
br_netfilter
EOF

sudo modprobe overlay
sudo modprobe br_netfilter

cat <<EOF | sudo tee /etc/sysctl.d/k8s.conf
net.bridge.bridge-nf-call-iptables = 1
net.bridge.bridge-nf-call-ip6tables = 1
net.ipv4.ip_forward = 1
EOF

sudo sysctl --system
As third step, we need the necessary Kubernetes repos:
sudo apt-get install -y apt-transport-https ca-certificates curl

curl -s https://packages.cloud.google.com/apt/doc/apt-key.gpg | sudo apt-key add

echo "deb https://apt.kubernetes.io/ kubernetes-xenial main" >> ~/kubernetes.list
sudo mv ~/kubernetes.list /etc/apt/sources.list.d

sudo apt-get update
and then install the following packages — targeting Kubernetes v1.27 — on every machine:
kubeadm: the command tool that we are going to use to bootstrap the Kubernetes cluster.
kubelet: the component that runs on all of the machines in your cluster responsible for starting pods and containers.
kubectl: the command line tool to interact with your cluster.
export VERSION = "1.27.0-00"
sudo apt-get install -y kubelet=$VERSION kubeadm=$VERSION kubectl=$VERSION kubernetes-cni
sudo apt-mark hold kubelet kubeadm kubectl
Last step, absolutely necessary for Kubernetes is to disable swap:
sudo sed -ri '/\sswap\s/s/^#?/#/' /etc/fstab
sudo swapoff -a
Initialize the control-plane
In this phase we are going to bootstrap the master node (the control-plane of Kubernetes where the cluster control components run as etcd, the api-server, the kube-scheduler etc)
export MASTER_NODE_IP = "192.168.1.210"
export K8S_POD_NETWORK_CIDR = "10.244.0.0/16"

sudo systemctl enable kubelet

kubeadm init \
--apiserver-advertise-address=$MASTER_NODE_IP \
--pod-network-cidr=$K8S_POD_NETWORK_CIDR \
--ignore-preflight-errors=NumCPU \
--skip-phases=addon/kube-proxy \
--control-plane-endpoint $MASTER_NODE_IP \
If you want to upgrade this single control-plane kubeadm cluster to high availability in the future, you should specify the --control-plane-endpoint to set the shared endpoint for all control-plane nodes. Such an endpoint can be either a DNS name or an IP address of a load balancer. Here we are going to go with IP addresses and we are going to use the IP address we assigned — or assigned automatically by the DHCP server of your network — to the Bridge NIC of your virtual machine. If the latter is the case, make sure that this IP address will not periodically change.
Unless otherwise specified, kubeadm uses the NIC associated with the default gateway to set the advertised address for the control-plane api-server. To use a different network interface, specify the --apiserver-advertise-address=<ip-address> argument. Here is used only for presentation purposes and it’s not necessary as the NIC is the same.
Here we want to use Cilium’s kube-proxy replacement. For that matter we need to instruct kubeadm to skip the kube-proxy during deployment phase, and that's the reason we've added the --skip-phases=addon/kube-proxy option.
Last but not least, you have to specify the--pod-network-cidr which will be the pool of IP addresses that your network add-on will use to assign IP addresses to Pods.
The installation will take quite some time, depending on the speed of your internet connection and your hardware. As long as it’s done and the control-plane is ready, execute in the master node the following commands:
sudo mkdir -p $HOME/.kube
sudo cp -i /etc/kubernetes/admin.conf $HOME/.kube/config
sudo chown $(id -u):$(id -g) $HOME/.kube/config

echo "Environment=\"KUBELET_EXTRA_ARGS=--node-ip=$MASTER_NODE_IP\"" | sudo tee -a /etc/systemd/system/kubelet.service.d/10-kubeadm.conf
we are now ready to get the worker join command, that we are going to execute in every worker node to join these machines in the cluster:
kubeadm token create --print-join-command
the output should look something like that — it might differ depending your kubeadm init configuration, and of course, you will see other hashes — :
kubeadm join 192.168.1.210:6443 --token zhdfbx.396793mudqat70dj --discovery-token-ca-cert-hash sha256:63a17b1e628200bb32a9b63d70b605214c1337833cc81e1ce6e30d02d8acd8be
Install Cilium
You can perform this step either from the host machine or from the the master node. If you choose the host machine you need to be able to talk to the cluster with kubectl. Find the file /etc/kubernetes/admin.conf in your master node and copy it in your host to ~/.kube/kube-cilium:
export KUBECONFIG=~/.kube/kube-cilium
If on the other hand, you want to do everything on the master node and you use the provided vagrant script just ssh to this box:
vagrant ssh master
To deploy Cilium, we need to execute the following commands:
CILIUM_CLI_VERSION=$(curl -s https://raw.githubusercontent.com/cilium/cilium-cli/master/stable.txt)
CLI_ARCH=amd64
if [ "$(uname -m)" = "aarch64" ]; then CLI_ARCH=arm64; fi
curl -L --fail --remote-name-all https://github.com/cilium/cilium-cli/releases/download/${CILIUM_CLI_VERSION}/cilium-linux-${CLI_ARCH}.tar.gz{,.sha256sum}
sha256sum --check cilium-linux-${CLI_ARCH}.tar.gz.sha256sum
sudo tar xzvfC cilium-linux-${CLI_ARCH}.tar.gz /usr/local/bin
rm cilium-linux-${CLI_ARCH}.tar.gz{,.sha256sum}

sudo cilium install --version 1.14.0
wait till all Cilium Pods settle to Ready state.
Join worker nodes to the cluster
To join a worker to the cluster, you have to execute the join command we acquired in the last step of the initialization of the control-plane on every worker node — assuming you have already prepared all boxes with the preparation prerequisites:
sudo kubeadm join 192.168.1.210:6443 --token zhdfbx.396793mudqat70dj --discovery-token-ca-cert-hash sha256:63a17b1e628200bb32a9b63d70b605214c1337833cc81e1ce6e30d02d8acd8be
Adjust of course with your unique IP address, port and hashes
wait till all Cilium Pods settle to Ready state.
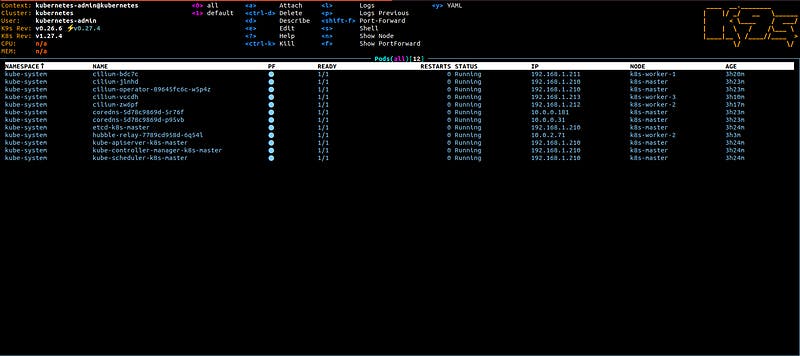
Our Kubernetes cluster is up and running supported by Cilium for Pod networking
And that was it. You have a brand new 1.27 cluster with Cilium running on Ubuntu. As the next, optional, step you could install Hubble, a fully distributed networking and security observability platform. It is built on top of Cilium and eBPF to enable deep visibility into the communication and behaviour of services as well as the networking infrastructure in a completely transparent manner.
sudo cilium hubble enable

sudo cilium hubble enable --ui
sudo cilium hubble ui

Now you could run Cilium’s connectivity tests:
sudo cilium hubble port-forward&
sudo cilium connectivity test
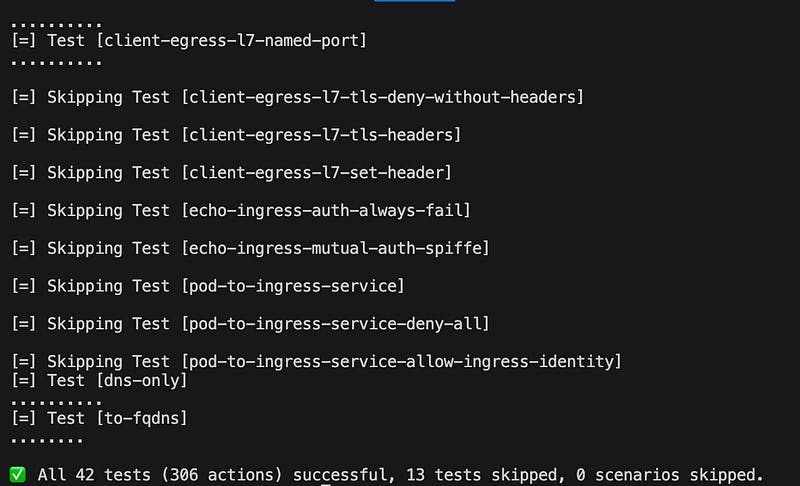
That will install a bunch of pods in the cilium-test namespace and it will take significant time till it’s done. If all went correctly you should see all the tests green.
The whole installation process packed in a vagrant script can be found in this repository:
If you found this information useful, don’t forget to 👏 under this article and follow my account for more content on Kubernetes. Stay tuned…